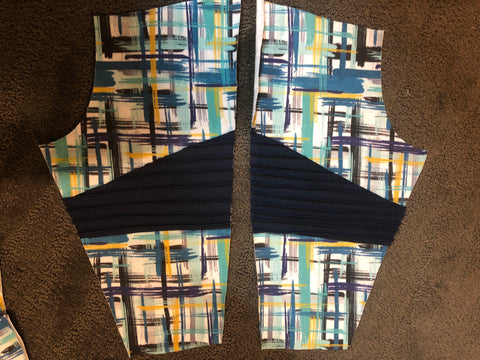
Hi crafty friends!! Today I want to show you how to get this awesome moto look on your kid’s joggers! Lucky for us, there are already sweet color-blocking pattern pieces included, so we just have to create the moto look on the fabric. Here is how I created mine!

First, I took the thigh patch piece from the pattern and folded it in half. Given the texture of the moto, you only want it on the front. I then cut a big square of fabric (at least a few inches wider than the pattern piece, and at least 3 times as tall as the pattern piece). You will lose a lot of height creating this effect, so yourself quite a bit of room for shrinkage.
Take the piece to your ironing board. Fold the fabric up ½”wrong sides together. I used a Hot Hemmer (in the photo below) to make it easy to measure it and make it even. Iron well. Fold up another ½”, iron. Make sure not to iron over the previous iron-line!

When all of your lines are ironed, take the piece to your sewing machine. This next step can be done with a regular sewing foot, but is MUCH easier with a Stitch in the Ditch/Edge Joining presser foot. The little guide will help you sew impossibly close to the edge of your fabric, which is what we are going for.
Fold the first iron line under, wrong sides together, and place under your presser foot. I found that I had to start just a little in from the edge of my fabric so that the machine didn’t eat my fabric.

Move your needle to the left a couple of notches so that you are catching both layers of fabric. Starting slowly, stitch across the length of your fabric piece. I found that I had to push the fabric (very gently) towards the presser foot to keep it butted up against the guide. Once you reach the end, fold the next line under and repeat. Continue this across the whole piece.

When finished, place your (folded in half) pattern piece over the moto’ed fabric and cut. Flip the pattern piece over and cut a second one (you’ll need opposite pieces, one for each leg).

Lay your moto pieces over the top of your FRONT leg pieces, and baste them in place. Do not skip the basting, you don’t want them to move!!

Then, grab a scrap piece of fabric, because this takes a little testing. Using a zig zag stitch, adjust the width and length to create a very close stitch, something like an embroidery machine would use to attach an applique. On my machine, this meant setting the stitch width to 4.0 and length to .6, to give the effect shown in the photo with the screen.

Using the Stitch in the Ditch foot again, line up the guide with the edge of your moto patch. Sew the tested stitchdown the edge of the moto patch, overlapping (and effectively hiding) the edge.

Using the Stitch in the Ditch foot again, line up the guide with the edge of your moto patch. Sew the tested stitchdown the edge of the moto patch, overlapping (and effectively hiding) the edge.

One your moto patches are finished, go ahead and assemble your joggers as per the pattern instructions. That’s it, you’re all done! Enjoy these adorable moto-patch joggers!

Blogpost written by Sonia Jessop

First, I took the thigh patch piece from the pattern and folded it in half. Given the texture of the moto, you only want it on the front. I then cut a big square of fabric (at least a few inches wider than the pattern piece, and at least 3 times as tall as the pattern piece). You will lose a lot of height creating this effect, so yourself quite a bit of room for shrinkage.
Take the piece to your ironing board. Fold the fabric up ½”wrong sides together. I used a Hot Hemmer (in the photo below) to make it easy to measure it and make it even. Iron well. Fold up another ½”, iron. Make sure not to iron over the previous iron-line!

When all of your lines are ironed, take the piece to your sewing machine. This next step can be done with a regular sewing foot, but is MUCH easier with a Stitch in the Ditch/Edge Joining presser foot. The little guide will help you sew impossibly close to the edge of your fabric, which is what we are going for.
Fold the first iron line under, wrong sides together, and place under your presser foot. I found that I had to start just a little in from the edge of my fabric so that the machine didn’t eat my fabric.

Move your needle to the left a couple of notches so that you are catching both layers of fabric. Starting slowly, stitch across the length of your fabric piece. I found that I had to push the fabric (very gently) towards the presser foot to keep it butted up against the guide. Once you reach the end, fold the next line under and repeat. Continue this across the whole piece.

When finished, place your (folded in half) pattern piece over the moto’ed fabric and cut. Flip the pattern piece over and cut a second one (you’ll need opposite pieces, one for each leg).

Lay your moto pieces over the top of your FRONT leg pieces, and baste them in place. Do not skip the basting, you don’t want them to move!!

Then, grab a scrap piece of fabric, because this takes a little testing. Using a zig zag stitch, adjust the width and length to create a very close stitch, something like an embroidery machine would use to attach an applique. On my machine, this meant setting the stitch width to 4.0 and length to .6, to give the effect shown in the photo with the screen.

Using the Stitch in the Ditch foot again, line up the guide with the edge of your moto patch. Sew the tested stitchdown the edge of the moto patch, overlapping (and effectively hiding) the edge.

Using the Stitch in the Ditch foot again, line up the guide with the edge of your moto patch. Sew the tested stitchdown the edge of the moto patch, overlapping (and effectively hiding) the edge.

One your moto patches are finished, go ahead and assemble your joggers as per the pattern instructions. That’s it, you’re all done! Enjoy these adorable moto-patch joggers!

Blogpost written by Sonia Jessop


