Hi everyone! It’s Lakeisha from Sincerely, Shantelle and today I’m on the Ellie and Mac blog with the steps to show you how to create a gorgeous blouse using the Summer Nights top from the pattern set. I was browsing Pinterest one day looking for some inspiration to sew up this beautiful floral fabric that I got and this pretty top jumped out to me. It didn’t take me long to realize that I could indeed recreate it, I just needed to think through the steps. I have them all figured out now, so I’m sharing with you. Let’s get to it!
For starters let’s talk supplies. You’ll need the Summer Nights pattern, the amount of fabric required for the bodice and sleeves (but order 1/4-1/2 yard extra just in case you need it for the length and extra width we will be adding), a small amount of knit interfacing, 1/2” elastic, and some tracing paper (or extra white paper).
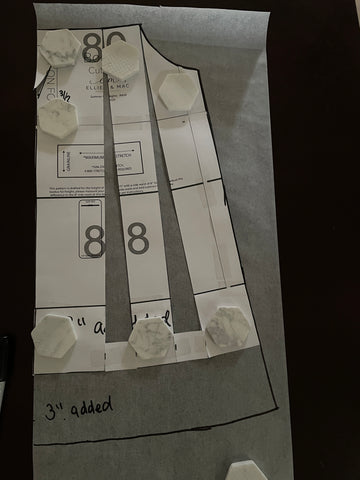
Print out or trace the pattern in your required size. Before cutting out the bodice and sleeves, you will need to add length to them. I settled on 2” on the sleeves and 6” on the bodice. (The first couple photos of the bodice show 3” but I realized later that the pattern piece was still shorter than I’d like, so I end up adding 3” again when I’m tracing the new pattern piece). If you’d like even more length to make it tunic or dress, or for your own proportions, add accordingly.

On the bodice, you will draw two vertical lines. I chose to draw one right near the armscye and another about an inch and a half over. The exact position doesn’t matter, as long it’s not in the armsyce. These will be the lines we slash and spread. Now, cut out the bodice pattern piece and cut along the vertical lines *almost* to the top. Leave about 1/4” connected. Cut two scraps of paper and mark 1.5” on them. Tape the bottom of your bodice to these marks, so that you create 1.5” gaps between them. On the fold line of the bodice, measure down 3.5”. and 1.5” over. Draw a horizontal line to connect them and create your front V. You will cut your front bodice with the V cutout and the back bodice on the full fold. Now trace your bodice pattern piece onto fresh paper or tracing paper, so it’s easier to work with.


Next, we will create the facing for the V. Trace the V neckline from the pattern piece, making a 1.5” horizontal line at the top of the bodice, and a 1.5” vertical line on the fold line of the bodice. Draw a horizontal line below the fold marking to help you create a smooth V. Starting from the top of the neckline, make marks that are 1.5” from the V. Continue to do this until you reach the bottom. As you get close, slightly round your marks so that they sit nicely on the red line shown. Use a French curve if you have one, or just eyeball it, hen trace to create a smooth, solid line. Now cut this piece out. It will be your facing. Mark the fold line so you don’t forget. The facing is complete.


Your pattern pieces are prepared, so now it’s time to get sewing! Go ahead and cut your fabric from the newly created pattern pieces! One extra piece that you’ll need to cut is the drawstring, but I didn’t measure entirely, I just cut a 1.5” strip that was the entire width of my fabric (60”) and figured I could just trim it down later. To prepare the facing, I cut a large scrap of interfacing that covered it and placed it on the wrong side of the facing. To protect my iron and my ironing board, I used a piece of regular paper and placed underneath these and covered with a press cloth to adhere. If you want to simply cut your interfacing from the pattern piece, that’s fine, but I found it easier this way. Apply the interfacing according to the instructions received with it, then using your paper scissors, simply trim the excess interfacing and paper and then peel the paper from the fabric. Easy peasy!


Depending on the fabric you’re working with you may also want to interface the front bodice. I just cut 1” strips and fused them on both sides of the V on the wrong side of the fabric. Next, place the facing so that it is right sides together with the front bodice and pin or clip in place. Using a 1/2” seam allowance and a straight stitch, sew the two pieces together. Start at the top of one side, and when you get to the center of the V, pivot and come back up the other side. Snip down into the center of the V, but make sure not to cut into your stitches.


Press the facing to the wrong side of the bodice and it will look like this. Topstitch the edges of it to secure to the top. Because interfacing was used on the bodice and facing, there is minimal stretch, so a straight stitch is efficient and produces a nice look. To make the drawstring, sew the strip with right sides together along the entire edge to create a tube. Use a safety pin, bodkin, or other turning tool to turn the drawstring right side out. Set this aside while you prepare to sew the top.


Finish the raw edges of your sleeves using a serger or zigzag stitch. I chose to do this flat before sewing the bodice, but it can also be done in the round. Now go ahead and sew the bodice, per the instructions. Once it’s complete, finish the top raw edge of the sleeves and bodice with a serger or zigzag stitch and turn the bodice wrong side out.

Fold the top finished edge 3/4” to the wrong side. Use a stretch stitch to create your drawstring casing, sewing about 1/8” from the finished edge. Using a bodkin, safety pin, or other tool, thread the drawstring through one side of the V front and come out the other.

We are almost done! Now, to prepare the sleeves. Fold each sleeve 3/4” to the wrong side and pin or clip in place. Using a stretch stitch, sew 1/8” from the finished edge all the way around the sleeve, leaving a 1-2” opening for inserting elastic into the casing. Measure your wrist and hand to determine the length of elastic that would be comfortable to you. I just wrapped elastic around my wrist and pulled it over my hand to do this and added an extra 1” to it for overlap. Cut two equal pieces and thread them into the sleeve casing using a bodkin, safety pin, or other tool. Once you come out the other side of the casing, overlap the ends of your elastic by 1/2” and sew with a zigzag stitch to form a loop. Stretch the elastic to pull it fully into the casing, then pin or clip the opening. Lastly, sew the opening, making sure not to sew over your elastic. Hem your bodice and your new top is ready!!


I really loved creating this top. Next time, I think I may actually spread the bodice completely so that it’s wider and gathers a little more like my inspiration pic. I will also add an inch or so of height to the bodice and sleeves above the armscye so that I’m able to pull it on my shoulders more (I can’t with the way it is now). Still, love it so much as is! I hope you feel inspired by this post and that you’ll do some creating with it, yourself. If you do, I’d love for you to let me know in our Facebook group. Until next time….


(Written by: Lakeisha Webb)


