Hi Friends! It is Sequoia and I am back with a new pattern hack! If you are anything like me you have a Pinterest board or screenshot folder filled with outfits you love and want to sew up. I add a few things to my collection each week so when I need to spark my creativity, I know exactly where to look. Last week, while trying to decide what to blog about for Ellie and Mac, I opened my Pinterest boards and found this dress in the photo below. I had saved it awhile back and knew I wanted to create a similar look. When I am looking for styles to recreate, I have to remind myself to ignore the color palette of the inspirational image. The important thing to focus on is the lines of the garment. The bodice and sleeves are usually my main focus. It is easy to change the length and width of garments, but I want the base fit to be correct so I leave that to the professionals.
When I first began sewing, I was scared to death to hack a pattern. With more experience, I have gotten comfortable with making changes. Now I do it frequently and without hesitation. Today I am going to share that process with you and help you gain the confidence to do this yourself!

The first step is to find inspiration. You can look at places like Instagram, Pinterest, Runway Shows or even RTW shops. My first ever guest blog post here was a Cardigan I saw at the local store. You can read about that hack here. Anything can be a source of inspiration. I often pull my phone out for a quick snapshot of something I like. When looking at my above inspiration photo, I am able to decide exactly what I love and what I don’t. I loved the cross front bodice and the tiered sleeves. I love the tiered skirt as well, but I wanted my version to be longer. I hated that snap closure on the bodice because it ruins the pretty line of the cross bodice. I also don’t really like drawstring waists. So now I have a plan. Photo reference is from Maurices.
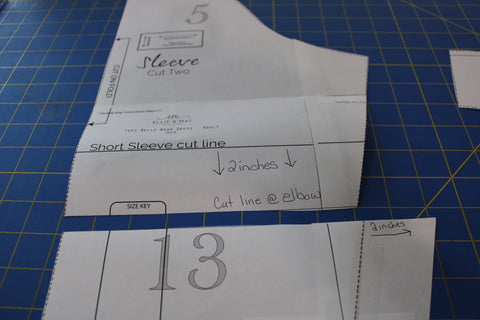
Next up- Determine where to begin. With this design, the bodice will require the most work therefore I want to begin with a bodice that is similar. I decided to go with the Tres Belle Wrap Dress (afflink) which has a beautiful overlapping bodice and several skirt options. It is also drafted for knits which is my favorite and what the gray dress is made from. With the knit fabric, the bodice can fit more snug across the bust which will eliminate the need the extra snap which I hated on the original. While looking at the bodice, we see the sleeves have a tier at the elbow. We can use the Tres Belle pattern’s long sleeve option to create this. I just rough guessed where I wanted the tier to be on my arm and sliced through the pattern piece. If you normally shorten sleeve patterns, you likely won’t need to add an extra seam allowance. If your arms are a little longer, add a seam allowance to the pattern pieces so you don’t end up too short.

You will need to widen the lower arm part of the pattern to give yourself a little extra room for the small gathers. I added 2 inches to the width of the TOP of my lower pattern piece which will give me 4 inches total since the pattern is cut on the fold and .75 inches at the BOTTOM.


This will allow just enough room to add a small elastic at the hem to create more gathering. Now sew your upper and lower sleeve into one piece. You will have to gather the lower sleeve to fit the width of the upper sleeve. Now assemble your bodice with the new sleeve tier and set it aside.

Third step- Look at the skirt the sample photo. The length is above the knee, but I prefer my dresses longer. The best part of making custom clothing is doing exactly what you want! I decided to go with the length of the half circle skirt which is in the pattern. I still planned to add a lower tier, so I need to do some adjusting. Since I sew at the larger end of the size chart at EAM, the bottom of my hem was wider than my fabric. I needed to slim the lower portion of the skirt down to make it fit on my fabric. Again, this is a pretty easy adjustment. You want to keep the waist width the same as always so that fits on the fabric, but grade down to reduce the width at the bottom of the skirt. I then cut 2 - 7.5 inch tall by the width of the fabric strips for my ruffle. Just like you gathered the top of your sleeve ruffle, gather your dress ruffle. It needs to be the same width as the bottom of your skirt. Sew the skirt and ruffle together, gathering the ruffle to fit. Now attach your skirt to your bodice according to the pattern directions! Hem your sleeves and skirt bottom for a neat finish!


I hope this post has encouraged you to try your hand at pattern hacking! If it does, let me know as I would love to see. If you want to see what I am working on, you can find me on my blog and youtube channel!
Afflink to Shop at Ellie and Mac http://ellieandmac.com?aff=240
(Written by: Sequoia Bond)


