I took the lovely Beatbox Romper as an example (the link leads you to the pattern).
 Pattern Cover
I have made this pattern numerous times, because it is such a lovely and comfortable lounge romper. The pattern offers a snap option in the smaller sizes, for easy diaper changing access. You can choose a regular neckband or a hood, three sleeve options and a pocket option.
 Linedrawing with pattern options
The larger sizes can get into the romper by the neckline. For some this sounds like magic, but it works! Nevertheless, some would like to add a placket to the front of the romper. And that is the inspiration for this blog!
Looking at the line drawing you see that you can either add a short placket and combine it with the front pocket, or you can add a long button placket (which leaves no room for the front pocket). I am showing you the last option in this blog. Let's go!


It is recommend to print the front bodice pattern piece for this step, but if you feel comfortable to wing it with a projection that is just fine. I printed this one pattern piece and used my projector for the other pieces.
Cut the front bodice on the fold and and lay the pattern piece on top of it (first picture). Determine where you want the placket to end (second picture), I made a long placket, but you can choose your own length. Draw you placket line at the fabric and cut the line (third picture).


Take some fabric and draw a placket piece with the length that you choose in the previous step times two (the piece will be attached to the left and the right side of the cut that you have made), and with a width of 2.75 inch (7 cm). I cut my fabric on fold because I find that easier to draw and cut.


Mark the end of the placket at the front and backside of the front bodice, to make sure you will know where to stop sewing during this step (first picture).
Then position the placket piece at the backside of the front bodice, with the good side of the placket piece against the wrong side of the bodice. Make sure that the placket piece sticks out about 5/64″ (2 mm) and pin (second picture). The third pictures shows the back view of what you just have pinned. Pin the placket piece from the top of the left side of the cutline to bottom and back up to the top of the right side of the cutline.

Then sew the two pieces together with your preferred stretch stitch.


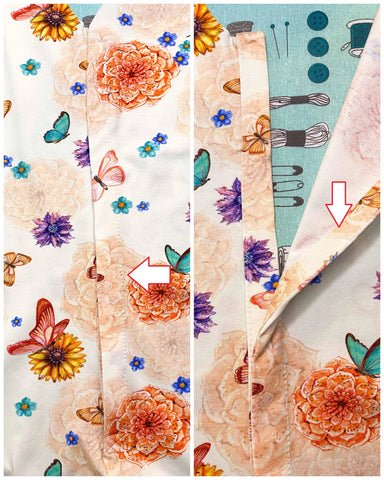
In this step we are going to form the placket. Turn the bodice to the right side, grab the fabric from the placket piece from the back side and fold it open. Then fold the placket piece 0.75" (19 mm) over and iron (see picture).

Fold the fabric into a point at the bottom of the placket (you have marked this spot before) to make sure the fabric doesn't get caught when you sew the placket in place.

Now fold over the placket piece once more towards the bodice. As you can see, this gives the placket it's final shape.

Sew the placket in place with your preferred stretch stitch and be careful at the pivot point where the placket ends (where fabric is folded in a V shape) and don't sew any fabric of the romper itself by accident.

The end result looks like this.


In this step we are going to fold the placket in place. I made a short video to show how to fold it:
Secure the placket by sewing a square with a cross in the middle at the bottom of the placket.

Topstitch the top side of the placket (first picture) while making sure you secure the folded part at the inside with the stitch (second picture).

The placket is now constructed.

Sew the rest of the romper according to the original instructions, but don't add the neckband yet. You can add a hood if you want, but I chose to use the neckband and will describe this option in this blog.

In this step we are adding the neckband to the romper. Fold the neckband lengthwise in half and sew both short sides (top picture). Then turn the neckband to the right side, poke out the two corners and iron the neckband.

Quarter the neckband and the neckline of the romper.

Add the neckband to the right side of the neckline. First the quarter points, then gently stretch the band to fit the neckline and clip or pin in place.

Sew the neckband to the romper, flip it to the top and topstitch when preferred. Add the snaps or buttons to the placket. Spread them evenly.

Congratulations! You have added a placket to the Beatbox Romper (or any other romper/top/dress).

(Written by: Manda Hoogstra-Rademaker, this blog contains an affiliate link to the pattern.)


