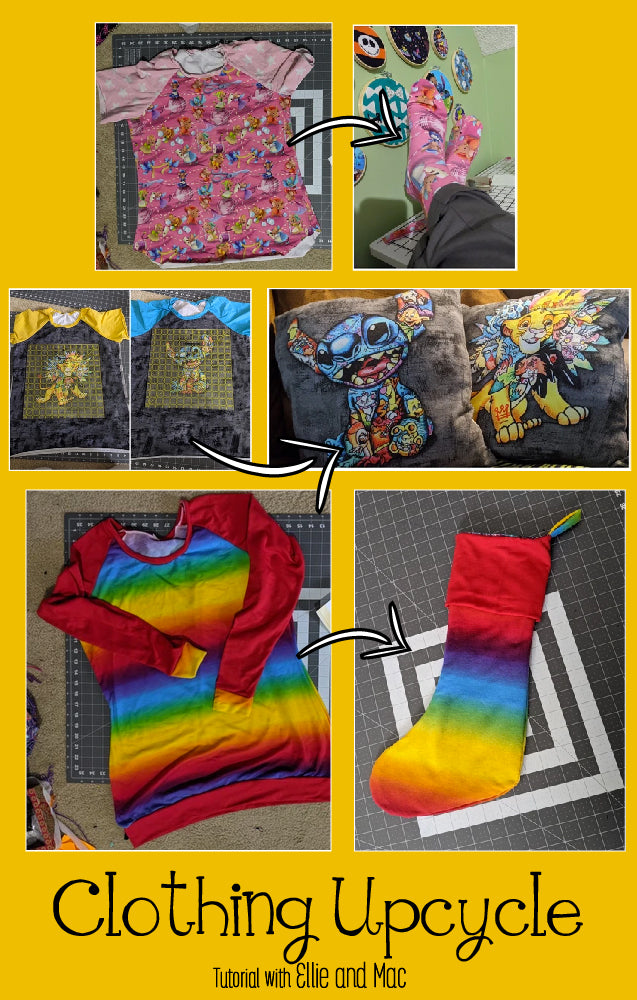
Hello, I’m Kathleen. In my town in Canada many homes have a holiday elf visiting them this time of year. Our little guy is named Jujube and he absolutely loves baking. When I saw that Ellie and Mac was releasing the adorable Baking Fun Apron & Mitt set I knew our Jujube needed one as he is quite a messy little fellow. Since the doll patterns are designed for 18 inch dolls, I wanted to share with you how I shrunk them down so that your Elf or Barbie sized doll can have their very own apron and oven mitt too.
1. Print the Doll Patterns at 60%
Open your Baking Fun pdf pattern in Adobe Acrobat DC or your preferred program. Go to the printing window and set the Scale to 60% instead of 100%. If you are on a phone and cannot find the option to change the scale, try on a computer instead. Select just the three pages of the file that have the Doll Pattern pieces and print them.

Use a ruler to measure the square labeled ‘1 inch’ on the paper. Since we printed at 60% it should measure a hair smaller than 5/8 inch.
2. Oven Mitt
Aside from printing at 60%, no changes are needed for the doll oven mitt pattern piece. However, for these tiny mitts omit two of the layers called for in the original pattern so that they are easier to turn right side out after sewing. I found just one layer of cotton on the outside and one layer of fleece as a liner worked well. Other than that, just follow the instructions for the Doll Oven Mitt in the pattern.
3. Modify the Apron Pattern Pieces
Since the Elf and Barbie sized dolls are smaller and slimmer than the 18 inch dolls, a few changes need to be made to the pattern pieces before cutting our fabric. First, remove 3/8 inch from the apron pattern piece along the fold line, then cut and tape your pattern pieces as you normally would.

The facing is tricky to work with for such small aprons. Instead of cutting one apron piece and using the facing piece to hide where the ties attach, cut two apron pieces so that we have a reversible apron. At our house Jujube the Elf and his friends love to bake year-round, so I chose a holiday print for one side, and an everyday print for the other.

4. Apron Pockets
Now is the time to add pockets if you like. Follow the instructions in the pattern. You may want to move them out to the sides of the apron slightly or go with just one chest pocket instead of following the pocket placement on the pattern piece. I had mine all cut out and ready to go but forgot to attach them for this tutorial. Oops! As Albert Einstein would say,
“A person who never made a mistake never tried anything new.” Can you tell I’m a science teacher?
5. Apron Ties
For the apron ties there is a reason ribbon is suggested- it will save you a LOT of time if you are not great at sewing a straight line on tiny, tiny straps. I did not have ribbon, but I did have bias tape that happened to be the same width as the pattern pieces (1 inch) when unfolded, so I used that instead.

If using fabric or bias tape, you will not be able to sew a tube and turn these tiny, tiny straps as indicated in the instructions unless your Elf can provide you with some sort of magic to get the job done. Instead, fold your ties in half wrong sides together lengthwise, press and open. Next fold the edges into the middle and press, then fold the edges in again lengthwise and press. For nice looking ends, flip the last ¼ inch of the tie into the fold so that no raw edges are showing. You only need to do this for one end of each tie since the other end will be hidden. Sew along the length of the ties.
6. Sewing the Reversible Apron
Pin the ties at the markings as shown in the pattern instructions and baste, making sure to keep the ends away from the edges.
Place the two apron pieces right sides together with the ties sandwiched in the middle and sew around the sides and top, leaving the bottom open. Clip the corners and curves then turn the apron right side out through the bottom, poke out the corners and press.

Flip the bottom ¼ inch of the apron into the middle and press. Topstitch around the whole main piece and you are finished.

I hope your little dolls will love their new reversible apron and oven mitt!

(Written by: Kathleen Rogers)