
![]()
Hi ya’ll! It's Lakeisha of Sincerely, Shantelle, again! As part of my recent Project Run + Play finale look, I made my son a hooded henley and when I shared in the Ellie and Mac Facebook group, I got tons of asks about how I made it. Today I’m gonna show you exactly how to add a hood to the Kid’s Pocket Henley….or any henley, for that matter! A secret between you and I…this is also the method I use to enclose the ends of the neckband in my henleys, as well!


For the particular version I am creating, I am using the body, sleeves, and hood from the Simple Patch hoodie and the placket from the Kids Pocket Henley. Feel free to use a hood from another pattern with the Pocket Henley or any other bodice you choose, but keep in mind you will need to remove any overlap that the hood may have so that the hood fits the neckline well. Go ahead and attach your bodice at the shoulder seams only. In order to enclose the ends of the hood inside the placket, you will not be able to follow the instructions within the Henley pattern tutorial. That’s where we will begin ;)
I will be referencing steps from the Henley pattern. Prepare your plackets by applying the interfacing to the center of each. Once you’re done, fold the seam allowances to the inside and press. While keeping the seam allowances folded, fold the plackets in half and press them each well. They are now ready to attach to the bodice. Apply interfacing to the wrong side of the center front bodice. Using a straight stitch, sew around the edge of the interfacing, as shown. Measure 1/2” from the center bottom and make a mark. Carefully cut down the center of the interfacing, then pivot, snipping closely into the corners at the mark. Make sure not to cut past into your stitches.


With the bodice right side out, place the first placket on one side of the center slit of the bodice, with right sides together. Pin or clip in place, and sew to attach. It is best to sew this with the placket facing up, so you stitch directly on the stitches from the box you sewed. Do not sew past the bottom of the original stitched box. Backstitch and remove.


Do the same thing on the other side of the bodice slit with the other placket piece.


Both plackets are attached to the bodice. Here are a couple views to show how it should look so far.


Prepare your hood. Remember, your hood should not be larger than your neckline. As a reminder, I’m using the Simple Patch hood since it’s already designed for a placket neckline, and fits perfectly. I did not have to modify it at all.

Mark the back center of your hood and neckline. I find it easier to do these next steps with the bodice inside out. Match the pins or clips so that you’re pinning or clipping the hood right sides together with the bodice.


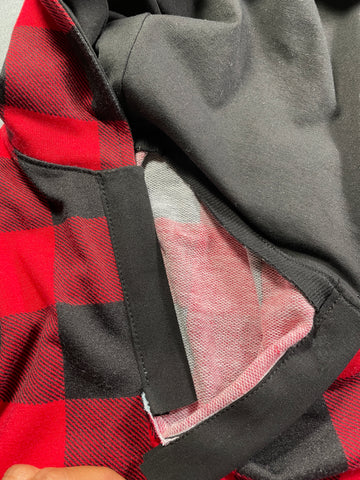
With the placket open, match each edge of the hood to the fold line that’s pressed on the placket. Fold the end onto the hood so that the hood is sandwiched in between the placket layers. From the top view, your placket edges should all be aligned, and the folded edges should remain folded. I find it really helpful to baste the ends with the hood in place before sewing with a serger, to prevent shifting and allow me to check if it’s aligned well before sewing permanently.


Continue to stretch your hood gently and evenly to fit your neckline and pin or clip in place. Sew, using your preferred stretch stitch. Turn the ends of the placket right side out.


Make sure your plackets are still pressed neatly. The folded edge should meet perfectly with the sewn one on the inside. From the right side of the bodice, sew the plackets closed (the red line shows where you’ll stitch). Make sure to stop right at the bottom stitch line of the original rectangle you sewed and backstitch on each side. Sewing past will result in puckers once placket is complete.


With the bodice turned out right side out, place the left placket down first (from your point of view). Next, place the right placket onto it. Push the bottom of the plackets in through the opening to the wrong side. Align the plackets with the triangle from the bodice. Do not stretch or distort this area, to help prevent puckering. Sew these layers together, right on that original stitch line.


Placket will look like this once the bottom pieces are sewn together! Topstitch the neckline in place, if desired. Next, stitch a square/X shape onto the bottom 1” or so for that RTW look, then just add your buttons or snaps. Finish your top (add sleeves, cuffs, hem…all that jazz), and your new hooded henley is ready to go!


I hope you’ll experiment with adding a hood to your next henley, and I’d love if you’d tag me in the Facebook group if you use this post. I always love seeing your creations, and happy to help whenever you get stuck. See y’all soon….

(Written by: Lakeisha Webb)


