
Hi all you amazing sewists! If you don't know me, I'm Jessica. I have a blog called Let's Go Hobby where I mostly write posts about sewing and gardening. You can check out my blog HERE. And I'll add links to other posts I've written here on the Ellie and Mac Website Blog at the end.
Diana, who does the YouTube Videos for Ellie and Mac Patterns, and I decided to do this hack together. I'm writing the instructions here with my tips and inspiration for the blog, and she made a video sewing tutorial for the YouTube Channel. I'll tell you where to find her video at the end.
On to this post!
The Jessica Tee & Dress Pattern
Have you seen the new Jessica Tee & Dress Pattern? If not, here's the line drawing for it -
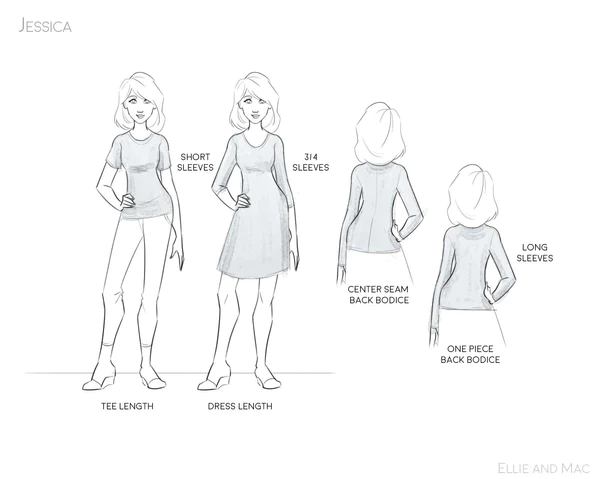
It's a super cute PDF sewing pattern that you truly can't use too much. It's the perfect wardrobe staple shirt to make again and again in every different color and knit fabric type to match with all of your DIY clothes!
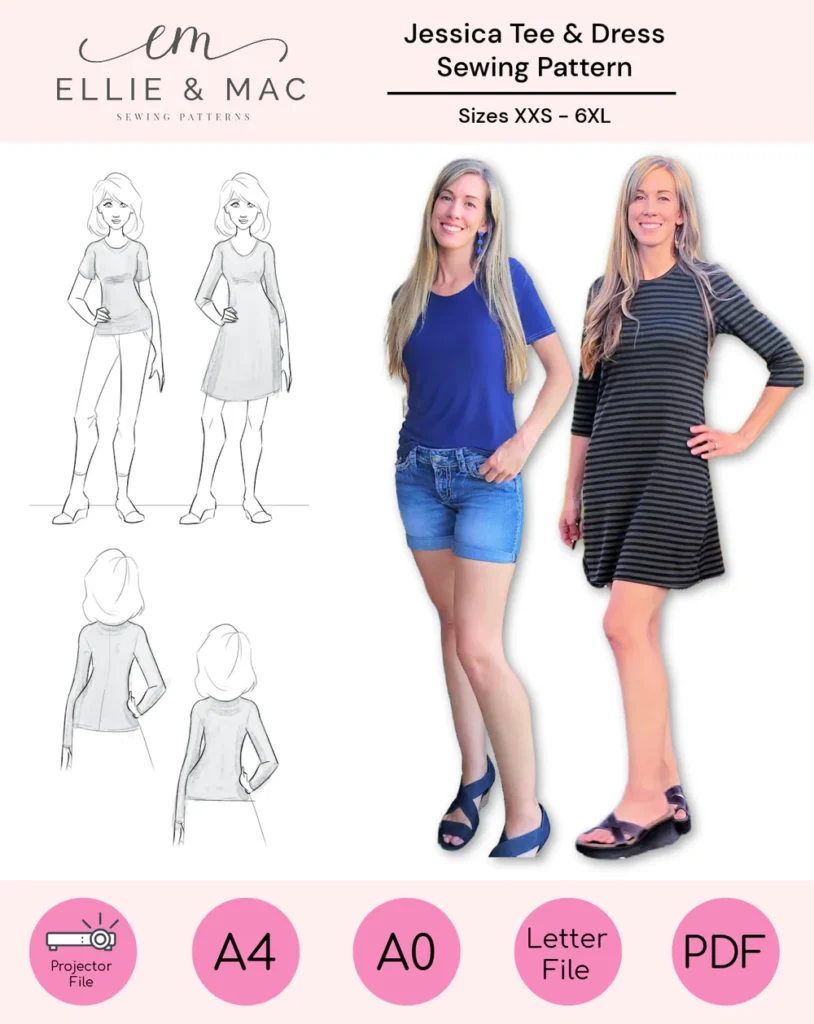
I've made two shirts and two dresses with the Jessica Pattern so far. You can see two of those sews on the Jessica Pattern listing cover:
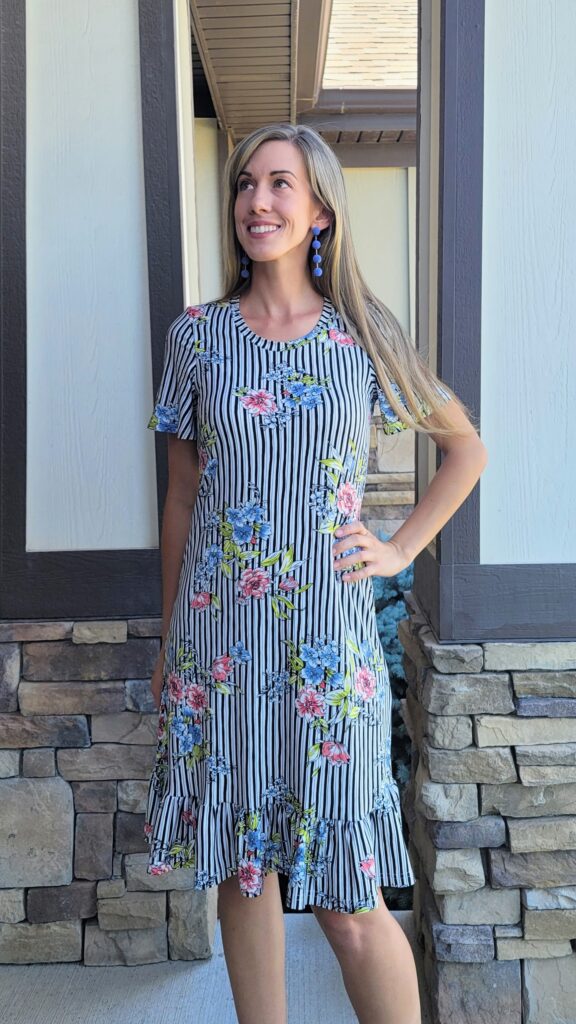
Top Details
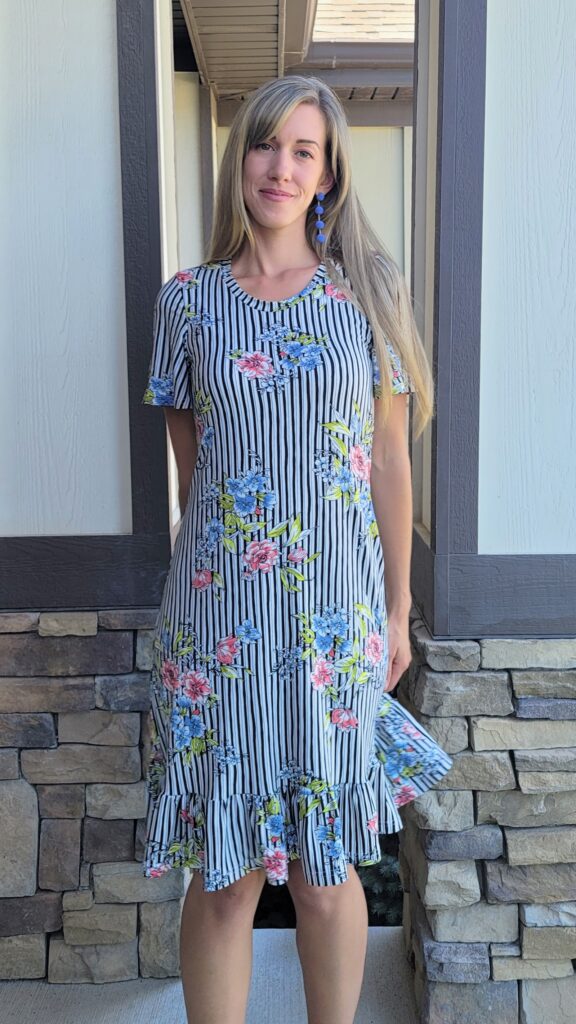
For the top pictured above I used a slinky 4-way stretch knit with slightly less than 50% stretch, maybe 35%. I love that top because it can look dressy or more casual depending on what I pair with it. I used the scoop neck cut line and chose short sleeves.
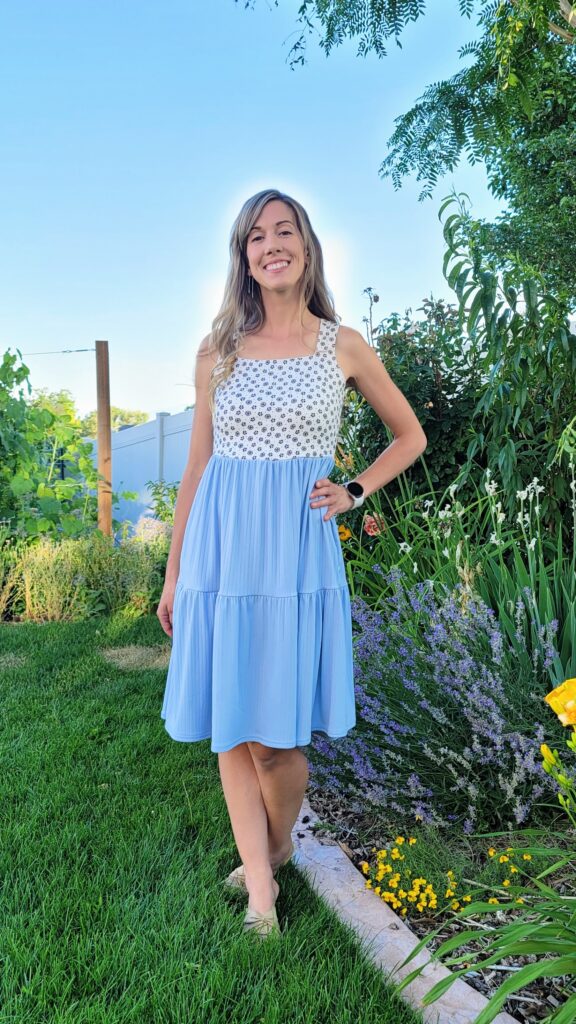
Dress Details
For the dress above, I used a ribbed knit fabric with 4-way, 50% stretch. This fabric felt a little "vintage" 2000s fall to me, so I cut the neckline at the crewneck curve and added 3/4s length sleeves.
The skirt for the dress is a bit shorter than I normally make. It hits about 3" above the knee which is really cute, but I want shorts or leggings underneath for the length at my age.
Pattern Hacking Inspo
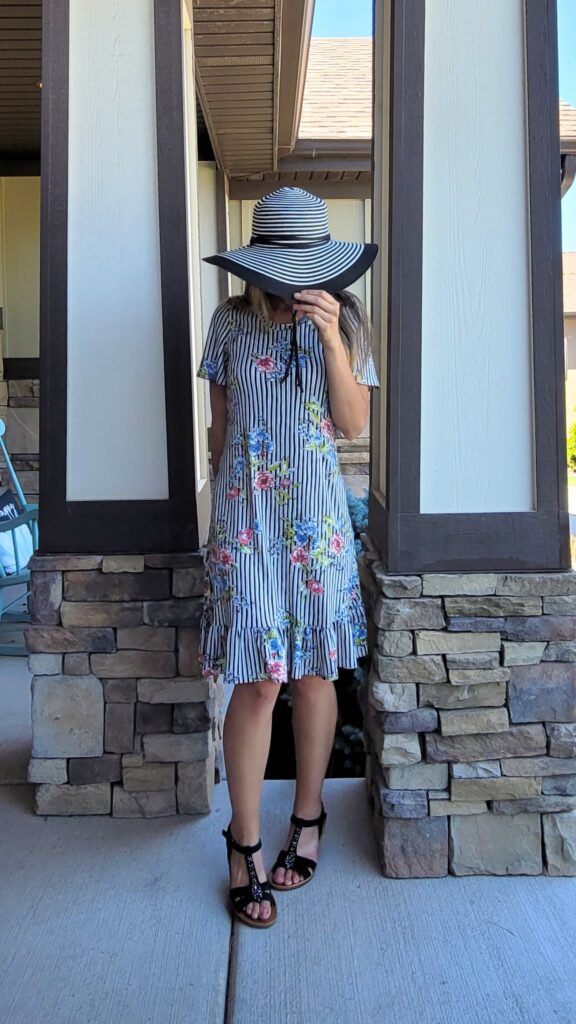
But the length got me thinking, what could I do to make this a bit longer? I LOVE the fit of the bodice and flare of the skirt, but I need inches. I could have just made it a bit longer, but instead I was inspired by another recent pattern, the Diana Tiered Top and Dress Pattern:

Isn't it gorgeous? It's all about the flowy flirty gathered skirt tiers and sleeves. And those necklines!
I made this dress as well:
And I love it. The gathered skirt and tiers give it such a lovely drape and twirl factor. So, I added a gathered tier to the end of the skirt to add length and fancy flair.
I call this newest hacked creation the "Jessica Diana Dress", here it is!:
I also modified the sleeves. You might know the actual Diana from the Ellie and Mac YouTube sewing pattern tutorials or from her cute and engaging stories and posts on social media. She made a video recently on how to turn regular inset sleeves into flutter sleeves. I had to do it! (disclaimer below)

Now, I should have followed along explicitly with Diana's videos because my sleeves don't flutter as much as hers and I wish they did. I'll spread the sleeves wider next time, but I'll show you how I redrafted the sleeves for my dress as well as link Diana's video. Read on.
How to Hack the Dress Pattern
The bodice doesn't need to be changed. It skims the body through the bust and then gently lets out the ease through the waist and hips. In other words, it's very flattering and nice to wear.
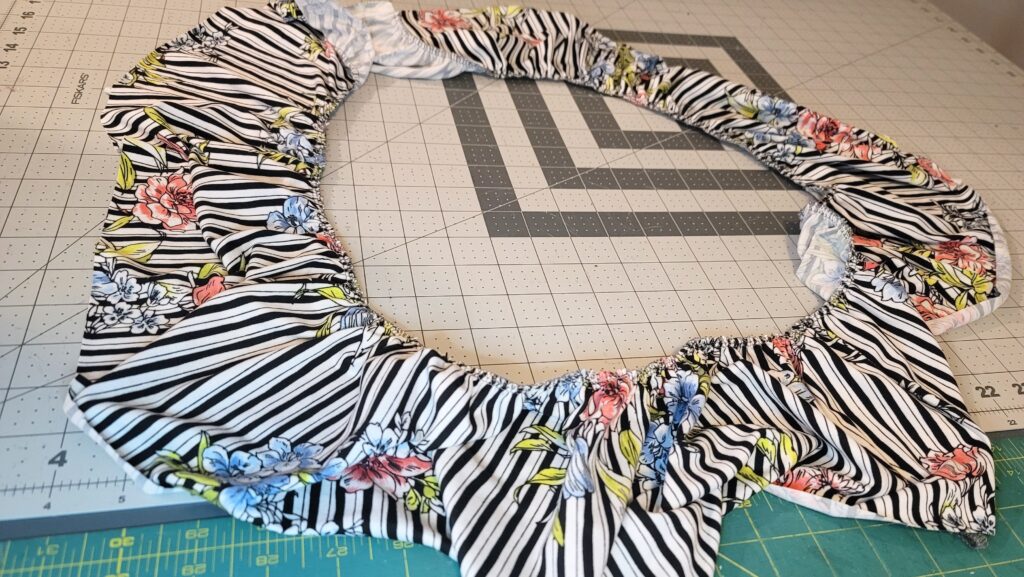
Gathered Hem Piece Details
To make the gathered hem, all you need to is to measure the hem circumference. Let's pretend your skirt hem measured 50 inches. You can measure your pattern pieces or your fabric. Don't worry about seam allowances since that won't change the look.
Take your total hem width and double that for the gathered tier, so:
Hem circumference x 2 = New Gathered Hem Piece Width
For the length, I just wanted to bring the hem down to the top of my knee, so I made the piece 4" in length. You can make yours shorter or longer depending on your desired dress length.
Gathered Hem Piece Length = 4"
I cut 2 pieces for the gathered hem tier. So in the example above, I would cut 2 pieces that were 4" x 50" (Length x Width).
If you don't have that width of fabric, you can cut the pieces to be less wide or you can cut 3 or 4 pieces and connect them together. If you do 1.5 times the width, you'll still get a gathered look, it just won't be as pronounced.
Assembling the Gathered Tier
First of all, when I sewed the dress, I did it in this order:
- Sew shoulder seams right sides together
- Sew ONE side seam from hem to bottom of armscye
- Attach gathered hem tier along open hem matching the width
- Close both the second dress side seam and the tier by sewing them RST
You can gather the tier in any way that you want. The way I gathered my tier was to connect my two cut pieces at on of the short ends and leaving the now connected piece long. I then gathered one edge with my serger. Using elastic or a long basting stitch or two on the sewing machine also works great!
Need more help on how to gather? Check out this post HERE.
Pro Tip - Iron the side seams towards the back of the dress before adding your hem tier.

Again, I didn't close my tier at both sides, I just sewed one of the short ends RST (Right Sides Together). Then, I gathered the tier to match the skirt hem width.
Here is all that in image form:


To finish the skirt, you'll just hem all the way around the bottom of the tier with whatever seam allowance you like. I enjoy using 5/8s seam allowance on my coverstitch machine. But of course you can also do 1/2" on your sewing machine with a twin needle or stretch stitch.
How to Make Flutter Sleeves
We will use the slash and spread method to create a DIY flutter sleeve. You'll start with the short sleeve from the Jessica Tee & Dress Pattern and we will modify from there.
I used my projector to cut it out first, but you can use the printed sleeve piece or even trace it off so you will still have the original for the next time you want to make the pattern as is.
Here's the tutorial in photo form, but I'll add Diana's link on how to do this in video form below as well.

Next, I made evenly space lines across the sleeve from the hem up. Mine are about every 2 inches.
This is where I made a mistake. It absolutely still works how I did it, but it's much easier and smoother to extend these lines up to where I drew them in the photo below. You'll see why in a minute.
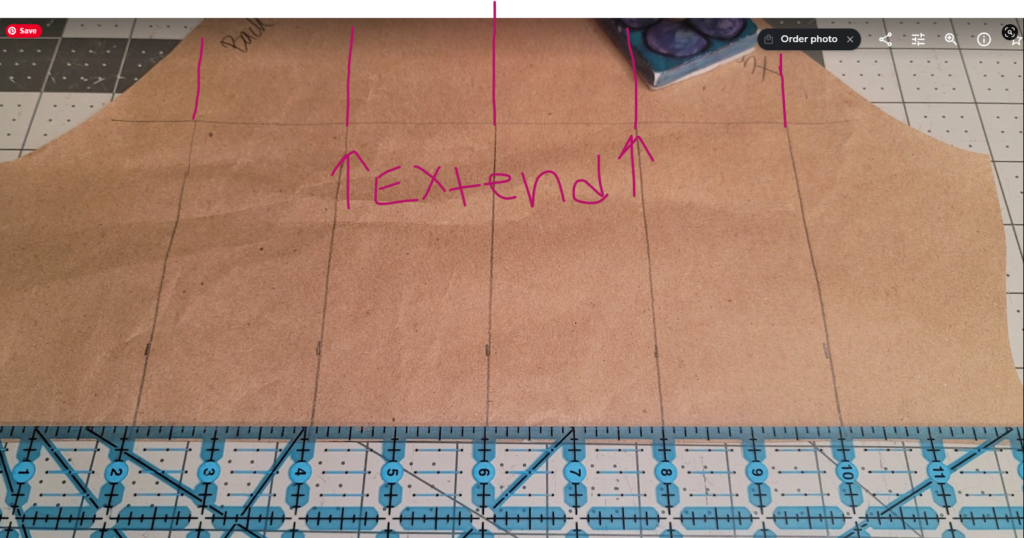
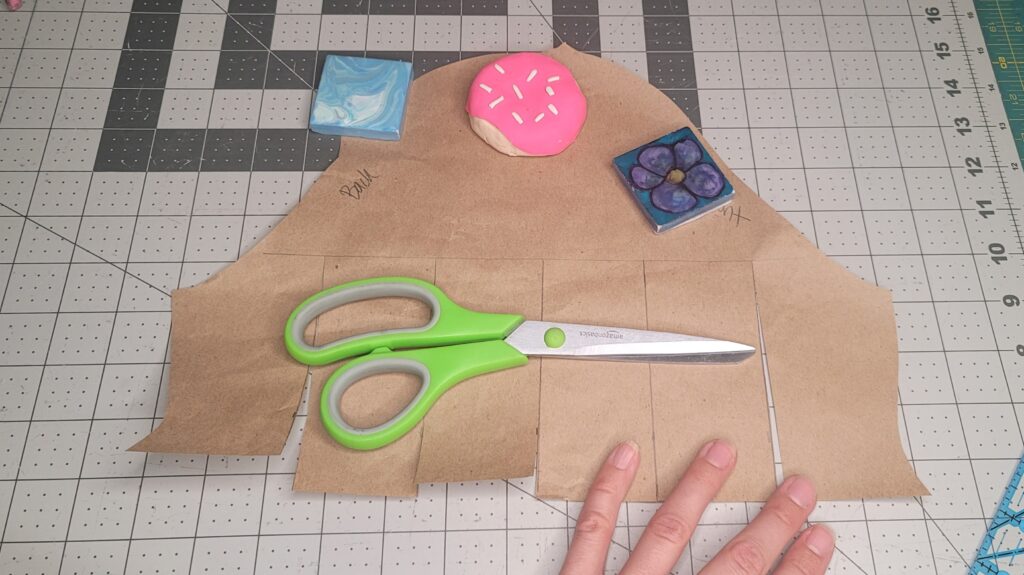
Now you will use scissors to cut the lines you drew. That's the "slash" part of the Slash and Spread Method.
Now, you will spread the pieces apart. Can you see why I should have drawn and cut the lines higher up?

Grab another piece of paper, and put it under the sleeve so that you can spread and tape your now wider sleeve to it. Then trim away the excess.
Because my lines were shorter, it caused the edge of the sleeve along the armscye curve to fold over. I measured how much I lost in the folds and extended the side of the sleeve out that same amount to account for the fold. That way my sleeve still fit into my bodice.
I hope that part is clear. If you draw your lines further up, you won't have this issue.

That's it! Now, just cut both sleeves mirrored and proceed as the pattern instructions direct you.
If you'd like to see how to make the flutter sleeves in video form, you can click below -
Sewing Tutorial - How to Draft Flutter Sleeves Video
Final Thoughts
I love how this dress turned out, it was simple to sew and so flirty yet modest and great for all sorts of occasions.
If you have any questions, feel free to contact me on Instagram @ www.instagram.com/sewletsgohobby
If you'd like to see this dress made up and follow along with Diana in video form, you can check out that tutorial on the Ellie and Mac YouTube Channel or watch it right now:
Previous EM Sewing Blog Posts
Interested in more sewing ideas, techniques, pattern hacks, and inspiration? You can select any of the previous posts I've written for the Ellie and Mac Blog by clicking the titles below:
- Make a Gardening Tote (with a free pattern)
- Going Home Sweater to Cardigan Hack
- Be Invincible & Urban Leggings Mash
- Exploring the Feel Pretty Pants
- Hack Your Wrapped Love Dress
- Be Dreamy Dress Hack
- Morning Lounge Wear
- Sunset Dreams Dress to Top Hack
- Be Smart Jumper Hack
- Add a Paperbag Waist to Any Skirt
- 3 Beginner Friendly Patterns To Create a Fashionable Outfit
I have also written blog posts on my own blog at www.letsgohobby.com, you can check out the Ellie and Mac related posts by clicking HERE.
'Til next time, Happy Sewing!!


