
![]()
Hey! It’s Sarah from Sew Salty and Free! I want to share you a really cute way to fancy up the Sunny Day Tunic/Dress. We’ll look at how to add an accent piece to the waistband and create a self-drafted tiered skirt!
Let’s start by gathering our supplies. For this hack we only need a few items. We need the Sunny Day Tunic/Dress pattern which can be found here, at minimum two different colored 4-way stretch knit fabric and some clear elastic as stated in the pattern. I made a practice dress and decided to change a few things, so half the pics will be one color and half will be another, but just overlook that ;).
I started by finding out the measurements for the tiers of my skirt and my accent piece. There was a little math involved, but it was super easy! I measured my bodice piece (mine happened to be 9.25”, I wear an XL in this pattern) and times it by two to give me 18.5”. You don’t need to add any extra to this measurement for seam allowance since we’re measuring the pattern piece itself and it has the allowance in there for you already. Set this measurement aside for a moment.
I used the length and width measurement from the pattern itself as a guide for the length of my knee length skirt. The length of the skirt for my size is 25”. I knew I wanted my bottom tier to be slightly shorter than the top and middle. So when I was dividing the length between the tiers I decided to use 9.5” inches for the top two tiers and 6” for the bottom tier. BUT! We can’t forget to add a seam allowance so our skirt still ends up 25” long after we sew our tiers together. I chose a ½ inch seam allowance. So my measurements for each tier ended up being 10” for the top two tiers and 6.5” for the bottom tier.
We need to decide the width for each tier. I decided to go with a one and a half times the starting length for each tier. For the top I used the skirt width from the pattern (for my size that measurment is 30) and left it as is. These numbers are just estimates, they’re not set in stone! Feel free to fiddle with them a little if you think you'd like a fuller or less full skirt. For a fuller skirt you could use 2 instead of 1.5 if you'd like. So for the first tier we used the measurement from the pattern (30") and made it 10" long. For the next tier we’ll take the number from that formula (30") and multiply it by 1.5. In my case that gives me 45”. And one more time we’ll multiply that new number (45") by 1.5 to get 60".
So our measurements for our tiers end up being:
- Top Tier: 30” x 10”
- Middle Tier: 45” x 10”
- Bottom Tier: 60” x 6.5”
We’ll need to cut 2 of each of the tiers. The easiest way I found to cut these long pieces (since they’re a little too long to cut while the fabric is folded) is to lay my fabric out completely flat and use my 24” quilting ruler (if you have a bigger one, that will be even more helpful) to measure and draw out my tiers onto my fabric with my chalk (or any preferred marking tool) one at a time and then cut them all out from there. If you can't get two full 60" cuts from your fabric, you have two options. You can just cut them as big as you can (but make sure they are a decently longer than the middle tier so we can get a good gather on them). Or you can cut 4 bottoms tiers about 30" long and sew two of them together. This will cause your front tier to have a seam down the middle.
Now that we have our tiers measured and cut out we need to talk about our waist accent. I wanted to add a fun waist accent that sort of mimicked a bow. This is where our previous set aside measurement comes in.
For this I used our first waist measurement of 9.25” and multiplied it by 2. Then I decided how tall I’d like the accent to be. This is totally personal preference, but I decided on about 5”. I didn’t bother adding a seam allowance because 5” is just kind of an eye-balled measurement of what I thought would look good, so I didn’t bother being too precise. The waist on the bodice tapers out slightly to follow our waistline up, so I ended up cutting out basically a trapezoid shaped piece. I measured up 5" on my bodice piece and took a measurement from there. The measurement was 20". So I cut out a rectangle that was 20" by 4". From there I divided the 1 1/2" difference by two and used that measurement of 3/4" to measure at the bottom of each side and cut a diagonal line from bottom to top (see pic below for visual detail on how to do this). I wanted the accent to extend all the way around the dress, so I cut out 4 of these pieces to create a full waistband.

Now onto the center of our bow! I wanted the bow center to be about 2” wide, so I cut out two squares that were 2.5" x 2.5".
So for review we need:
- Waistband pieces (cut 4): 18.5" (tapered up to about 20") x 5"
- Bow Center (cut 2): 2.5" x 2.5"
Reminder! These measurements will depend on your own dress size and may be slightly different.
Now that we have all our tiers and our waist pieces cut out we need to cut out our bodice and our pockets for our skirt (included in the Sunny Day Tunic/Dress pattern). Follow the instructions in the pattern for this. In the end we’ll have two main bodice pieces, two liner bodice pieces, and 4 mirrored pocket pieces along with our additional accent pieces and skirt tiers from earlier in the blog.
From here we will sew the shoulder seams together on both our liner and our main bodice as instructed in the original pattern. We will also sew along the top and bottom (long) side of our front waistband accent pieces and only the top of our back waistband pieces. We'll also place our bow center pieces right sides together and sew the sides together.

Sew all of these pieces, turn right side out and press seams flat.
Before we connect our waistband to our bodice it's a good time to sew our bow center onto our front waistband piece. To do this simply wrap the bow center around the waistband piece and match the raw edges together. Sew the raw edges together and turn your bow center piece inside out so the seam you just sewed is now on the inside of your bow center and turned to the backside of your waistband.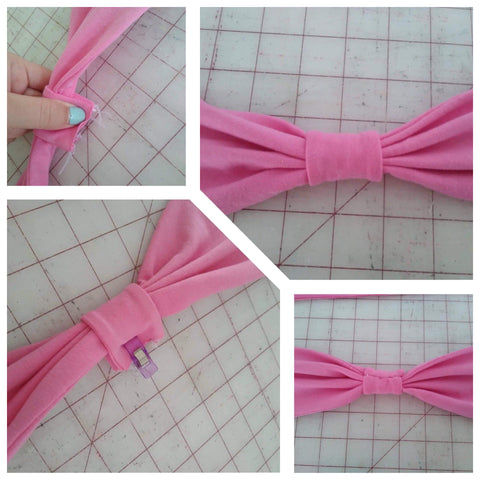
Now we'll take our waistband accent pieces and place them along the bottom of our main bodice pieces only. Baste them in place. If you choose, you can use a zig zag stitch or use your preferred stretch stitch to topstitch the top of the back waistband to your bodice.
We'll follow the directions in our pattern next and sew our neckline and then burrito roll and sew our side seams together (the Sunny Day pattern has a great video and more detail on the burrito roll).
Set bodice aside.
With our bodice complete we now need to start assembling our skirt tiers. I chose to add pockets to my dress, if you'd like to omit them skip this next step.
Adding pockets: In the Sunny Day Pattern it is suggested to place the pockets 4" below the top of the skirt. Since our top tier is only 10" long this will cause the pocket to extend past the bottom of the tier by about an inch. To fix this we need to prepare our middle tier before we can proceed with attaching our pockets. To do this we will take the middle tier and gather the tops of both of the middle tier pieces in our preferred method so that it become the same width as our top tier. place the gathered top of the middle tier right sides together lined up with the bottoe raw edge of each top tier and sew them together. While we're at it we will do the same thing with the bottom tier.
From here you can treat your skirt like a normal skirt. Add pockets as described in the Sunny Day pattern.

All of our hacks are now complete! Yippee! Now we'll simply follow the rest of the instructions from the Sunny Day Dress to complete our dress! I chose to do a rolled hem for the bottom of my dress and I love how it turned out! But any hem you feel most comfortable with will look great!
I am absolutely in love with the results of this hack and I hope you are as well!
If you have any questions about this hack please reach out to me at my Facebook, or Instagram!
(Written by: Sarah Lewis)


