

Hey y'all! It's Lakeisha, again from Sincerely, Shantelle, and today I've got a very easy, very practical sewing tutorial to share. I will show you 3 different ways to make your own placements!

My house isn't super decked out in decor, but love placements for our dining room table. I like to switch them out for seasons, and have different color schemes for whenever it's not really a "festive" time of year. As I was putting away our fall themed placements, I started to consider how simply they are constructed, which led me to set out making my own. The best part about this is, I have thousands of fabric choices at my disposal, as opposed to the 20 or so placemat sets I could choose from Homegoods.
Materials
The first thing to consider is the size/shape of the placemats. Due to the size of our table, we alternate between circle and rectangle. The measurements for the store bought ones I use are: rectangle 11.5" x 17.5" & circle 15" diameter. A good way to decide if you should use other measurements is to measure your biggest household plate and make sure whatever you choose, the bottom of that plate will sit nicely on the mat. You can make any shape you want, as well! When you're sewing something, you can make it to your heart's content :)
There are many fabrics to be used to make placemats. Oddly enough, the few I have that still manage to have the tag on them are cotton and polyester blends, though I think that using 100% cotton is actually better. From a textile perspective, cotton holds up better to heat than polyester, so that alone makes me gravitate more towards it for fabric choices. Pull out that quilters cotton you bought before you knew it wasn't the best fabric to make clothes from haha! If you're making placements that you'd like to be able to wipe, try using laminated cotton or PUL for easy cleanup without having to go into the wash.
If you just need some quick and easy placemats to protect your table from scrapes and just want to spruce up the space, all you'll need is whatever fabric you choose. (It took me a little over 1 yd total to make 4 rectangle placemats, btw). In one of the methods, I will be using 2 layers of fusible fleece, and in the last I will be using 2 layers of cotton batting. Insul-Bright Insulated Batting is a good choice to use if you're worried at all about any heat damage to your table (especially wood). If you are using batting to make yours, you will also need bias tape to finish off the edges. For rectangle shapes, a rotary cutter, mat, and ruler come in handy!

Method 1 : Quick & Easy
This method will be by far the quickest and easiest...so easy, a kid could for sure make these! This method will be the turn & topstitch, and will require just two layers of fabric in whatever shape/measurements you decide on. I am making the rectangle that will finish at 11.5" x 17.5", so I cut two rectangles (one of my top fabric and one of my bottom fabric) at 12 x 18, so this includes 1/4" seam allowance. A rotary cutter, mat and ruler make this process really quick and accurate. Once you have the pieces cut, put them right sides together, Sew around the outside all the way, except leave a 3" or so opening on one of the edges to turn it right side out. Trim away the corners and press the mat, then turn it right side out, through your opening. Use a point turner to get neat corners, then press well. Topstitch a row or two, or even use a decorative stitch around the outer edges. This will close your opening, as well. It's done! Make the rest of your set.


This method will be just as as easy as the previous one, The only difference is that it adds a layer or two of fusible fleece to provide some cushion to the mat. I cut the fusible fleece the same size as the mat measurements, then go back and trim just a tiny bit from the edges so it doesn't hang off the fabric. Since this is something that will get used (and possibly washed) often, I prefer that the interfacing is caught in the seam stitches, to minimize shifting or lifting over time. After the edges are sewn, trim away one of the seam allowances to minimize bulk in the seam, then turn right side out and finish the same way as you would for the previous method.


Method 3: Quilted and Bound
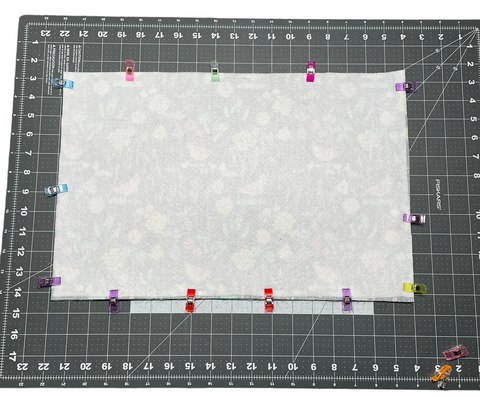
This method is the most time consuming & uses the most materials, but yields such a beautiful result! Instead of cutting your fabric to measurement, cut it with an extra 2" all around. Cut your batting of choice 1-2" larger than this. You want to make sure in the end you get the intended size, and the quilting process can shift things a bit, so you often end up trimming bits from your fabric to make it even. You will create a quilt sandwich by placing the main fabric with the wrong side touching the batting on one side, and on the other, the liner fabric wrong side will be touching the batting. You should see the right side of each fabric when you fold it back. Stick pins in the edges to help align them, then put a few throughout to help you keep them from shifting as much. Keep in mind, no matter how hard you try, some shifting will still likely occur. A walking foot comes in handy for the sewing portion. The multiple layers will stay together a little better with one. If you don't have one, consider reducing your presser foot pressure to help.


To quilt the layers together, start from the top edge somewhere in the middle(ish) and sew however you choose. You may free-motion, but I'm not a quilter, so I just stitch straight lines parallel to one another, using my presser foot as a guide for the next row. I backstitch exactly at the beginning and the end of each so I can have a have a clear guide of where the edges of each fabric have been stitched. Repeat this process until you're done. Note how the stitches are visible off the edge of my liner fabric. That's because it shifted slightly. Remember this is okay. It will be fixed in the next step. Mark each side of your fabric to figure out where your new edges are, and trim off the excess batting (and some of your excess fabric) to get it to the correct measurements.


A note on binding before continuing: single fold or double fold can be used for these placemats. You can stitch the "proper way" by sewing in the ditch of one to attach and then folding afterward to cover the raw edge. YouTube has lots of tutorials on sewing binding. I use the quick method I've photographed here to save time on these. To bind the edges, wrap one edge of your binding over the quilt sandwich edges at the bottom middle and pin, then head to your sewing machine. Stitch at a manageable pace for yourself, wrapping the binding over the edge as you sew close to the edge of it. When you get to a corner, backstitch and remove. Fold the binding down and over to the next side. Squish the corners over, then start sewing at that corner, backstitching at the end. This results in soft, rounded corners, but it's very easy to do. If you are a quilter or have more experience than I do with binding, you can use another method to attach your binding and miter your corners. As you near the place you started, trim binding so you have about 1" overlap of you starting point. Open the pre-pressed folds of your binding and finger press the raw edge back 1/4" or so. Next, fold the binding back along the pre-pressed folds. Overlap where you started, and continue sewing, backstitching at the end. You're done!!


In conclusion...
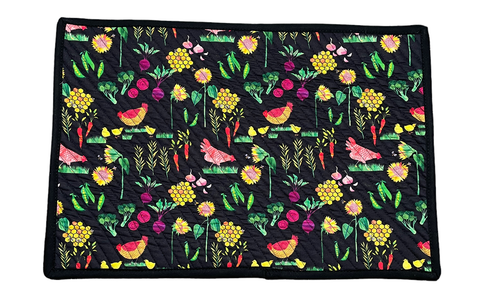
I hope you enjoyed learning how to make placemats and are convinced how easy they are. I think I will stick to method 1 for holiday specific placemats that we use for only a day or so, then method 2 for most year round use. Even my husband chose those as his favorite style, They feel very sturdy and provide the perfect amount of protection to our table. Method 3 is lovely too, but as time consuming as it is, we may only end up with a set or two of them in rotation.


Which style will you make? Tag me in our Facebook Group if you use this tutorial to make placemats. I'd love to see!
#DIYHomeDecor #DIYwithEAM
(Written by: Lakeisha Webb)


